


TDS Statement Upload
Following is the TDS Statement Upload procedure www.incometaxindiaefiling.gov.in
The facility to upload online quarterly TDS/TCS statements in the E-Filling portal shall be available with effect from 1st May 2016.
Pre-Requisites for Uploading TDS Statement
To upload TDS, user should hold valid TAN and should be registered in e-Filing.
Statement should be prepared using the Return Preparation Utility (RPU) and validated using the File Validation Utility (FVU). The utilities can be downloaded from tin-nsdl website (https://www.tin-nsdl.com/).
Valid DSC should be registered in e-Filing.
Pre validate Principal Contact’s “Bank Account/Demat Account details“or link Principal Contact’s PAN with Aadhaar. (In order to upload using EVC)
Procedure to Upload TDS /TCS Statement
To Upload TDS, the steps are as below:
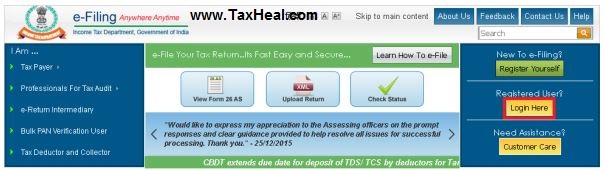
Step 1: In e-Filing Homepage (www.incometaxindiaefiling.gov.in) , Click on “Login Here”
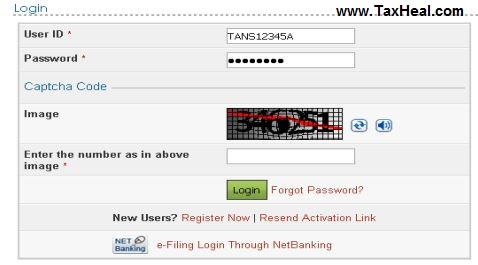
Step 2: Enter User ID (TAN), Password, and Captcha. Click Login.
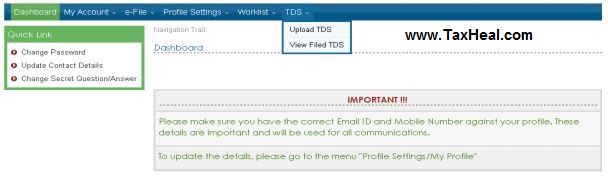
Step 3: Post login, go to TDS Upload TDS.
Step 4: In the form provided, select the appropriate statement details from the drop down boxes for
FVU Version
Assessment Year
Form Name
Quarter
Upload Type
Note:
TDS can be uploaded from Assessment Year 2011-12.
Only Regular Statements can be uploaded in e-Filing portal.
TDS Statements uploaded in TIN -FC /NSDL are not to be uploaded again in e filing portal
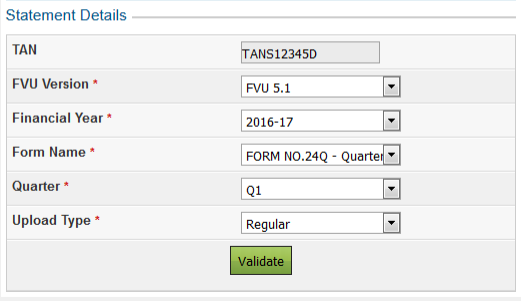
Step 5: Click Validate to Validate Statement details.
Upload TDS Statement using DSC

Step 6: “Upload TDS ZIP file”: Upload the TDS/TCS statement (Prepared using the utility downloaded from tin-NSDL Website)
Step 7: “Attach the Signature file” Upload the signature file generated using DSC Management Utility for the uploaded TDS ZIP file. For further details on generating Signature file click here. Navigate to Step by Step Guide for Uploading Zip File (Bulk Upload)
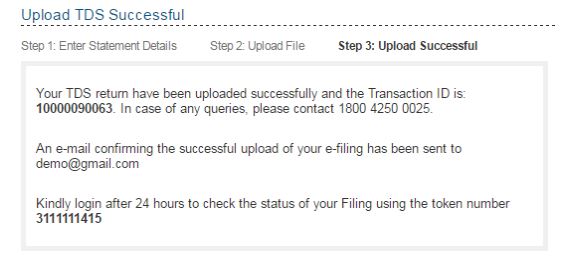
Step 8: Click on “Upload” button. Once the TDS is uploaded, success message will be displayed on the screen. A confirmation mail is sent to the registered email id.
Upload TDS Statement using EVC
If the DSC is not generated, then the following screen appears.
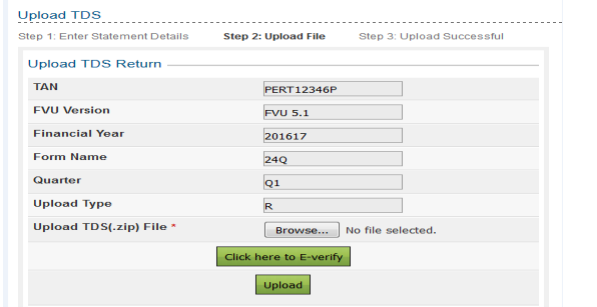
User has to click on “Click here to E-Verify” button in order to e-Verify TDS. The taxpayers are provided with three options to e-Verify as shown in the below screen.
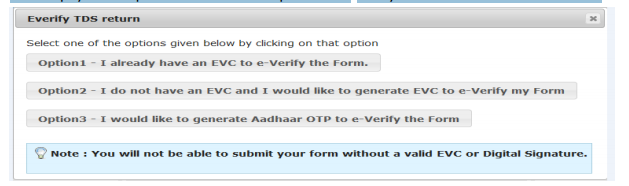
If the user selects “Option 1- I already have an EVC to e-Verify the Form”, the following screen appears.
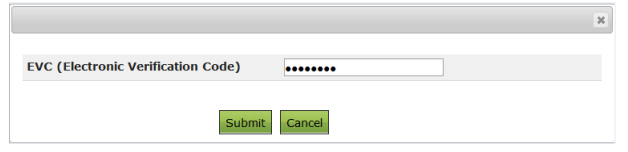
Enter the EVC and click on “Submit”.
If the user selects “Option 2- I do not have an EVC and I would like to generate EVC to e-Verify my Form”, the following screen appears.
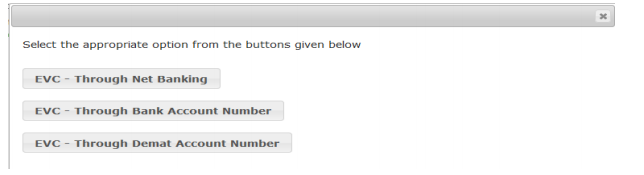
EVC can be generated by selecting the appropriate option from the screen as shown above.
EVC – Through Net Banking
Follow the steps carefully as mentioned below, in order to generate EVC through Net Banking

EVC – Through Bank Account Number
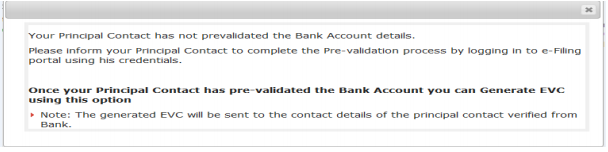
Pre Requisite: In order to generate EVC through Bank Account Number, the Bank Account Details of the Principal Contact has to be pre-validated.

Click on “YES” to generate EVC, the generated EVC will be sent to the principal contact‘s Verified mobile number and email id.
If the Principal Contact has not pre validated the Bank Account Number, the following screen appears
EVC Through Demat Account Number
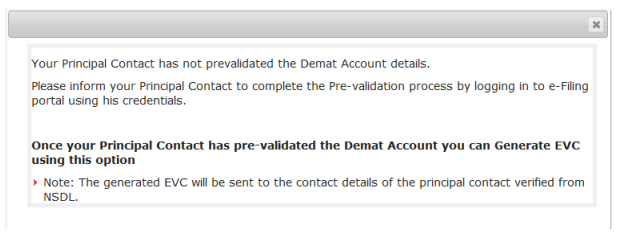
Pre Requisite: In order to generate EVC through Demat Account, the Demat Account Details of the Principal Contact has to be pre-validated.

Click on “YES” to generate EVC, the generated EVC will be sent to the principal contact‘s Verified mobile number and email id.
If the pre-validation is not done then the following screen appears
If the user selects “Option 3- I would like to generate Aadhaar OTP to e-verify the Form”, the following is the pre requisite.
Pre requisite: The principal contact has to complete the Aadhaar-PAN linking process. The generated Aadhaar OTP is sent to the principal contact’s Mobile Number.
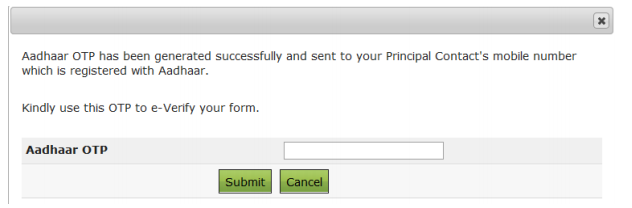
Enter Aadhaar OTP and click on the “Submit” button.
If the principal contact’s Aadhaar is not linked with the PAN, the following “Message” appears.

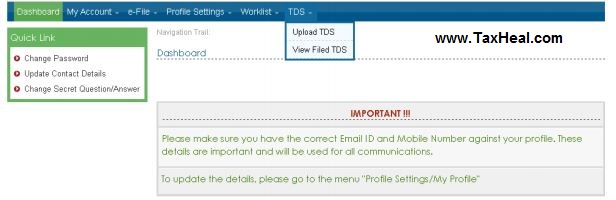
View Filed TDS Statement
To View the Filed TDS statement, the steps are as below:
Step 1: Login to e-Filing, Go to TDS View Filed TDS.
Step 2: In the form provided, select the details from the drop down boxes for Assessment Year, Form Name and Quarter respectively for which the TDS was uploaded.
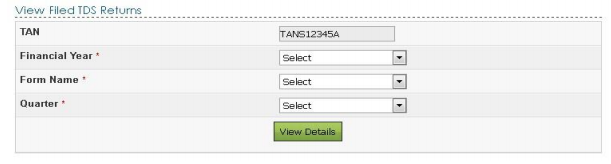
Step 3: Click on “View Details”.
Step 4: The status of the TDS uploaded is displayed.

Once uploaded the status of the statement would be “Uploaded”. The uploaded file will be processed and validated. Upon validation the status will be either be “Accepted” or “Rejected” and would be reflected within 24 hours from the time of upload.
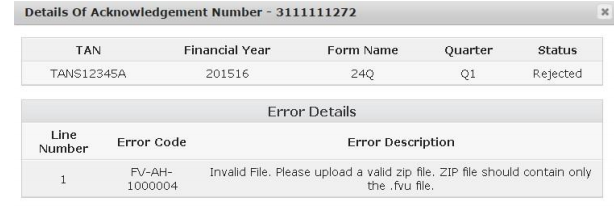
Step 5: In case if “Rejected”, the rejection reason will be displayed.
If the status is “Rejected”, click on the Token Number to view the error details.

Reason for rejection would be displayed as below:
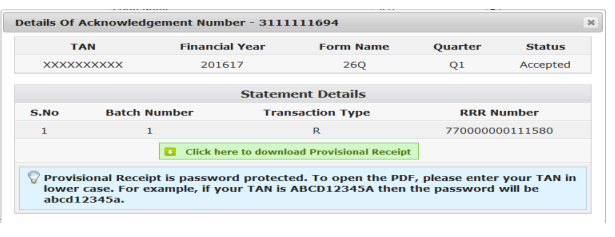
Step 6: In case if “Accepted”, click on the Token Number to view the Statement Details and download the Provisional Receipt as shown in the below screen.